Apple Powerbook 520 & 540 Modifications
& Fixes
Updated 5/20/99.
I had two Apple 520c powerbooks. This page
details things I did to repair problems I encountered and modifications
I
tried that worked. Almost none of these repairs are for the faint at
heat. I provide this information for you to use at your own risk. I
fully believe it to be accurate and true, but I provide no warranty.
Your powerbook contains static sensitive circuitry and it is very easy
to destroy it without even realizing what you have done. Be sure to
work at a static free workstation and keep you and your work grounded
at all times.
Add an FPU to your Powerbook 520 or 540
If you have the equipment and skill, you can
obtain from Motorola a full blown 68040 CPU and unsolder the surface
mount 68LC040 and solder in the full blown version with the FPU. The
exact part you need depends on whether you use have a 520 or a 540 CPU
daughter board. The 520 daughter board uses a 25 MHz version, the
MC68040FE25V or the MC68040FE33V or anything faster. (The 25 and 33
specify the 25 MHz and 33 MHz versions.) If you are modifying a 540 CPU
daughter board, you will need something 33 MHz or faster, the
MC68040FE33V or the MC68040FE40V. You will also need a small Torx #8
screwdriver to open your powerbook.
- Remove the 2 screws that hold in the keyboard
on the bottom of the powerbook.
- Remove the keyboard (it will still be
attached by a ribbon cable - you can disconnect it but it's not
required). Be careful with these ribbon cables. They can tear easily!
- Remove the 2 screws on the back on the
powerbook inside the flip cover. (They are on each side of the serial
number plate.)
- Now you will be able to take out the plastic
strip under the screen.
- Remove the 2 screws holding the metal grill
in the middle of the powerbook.
- Remove the 1 screw at the back of the grill
(which you had to remove the plastic strip under the screen to get to).
- Take out the grill.
- If you have a memory card currently - remove
it.
- Remove the old processor daughter card.
- Carefully unsolder the old 68LC040 from the
daughter card. I recommend using the latest in technology. No ordinary
soldering irons PLEASE! There are around 180 pins on this surface mount
IC. It is imperative that you do NOT damage any of the pads on the
circuit
board.
- Carefully solder in the new surface mount
68040. This is also a very tricky operation. You need the correct
tools, and expertise. I've been soldering since I was a teenager, but I
don't consider myself good enough to do this step and the last one. I
had my friend, and expert solderer Jim Forsyth at the college's
Technical Services Shop do the work with me looking over his shoulder.
- Reassemble in reverse order.
Fix a Shorted Cell in your PB500 Battery
When your battery won't charge anymore, then it
might be a shorted cell, as it was in mine. You can replace all the
cells as well. I have done two at this time. This is actually a
much better solution than just fixing the shorted cell, but it will
cost you about $50. If
you are interested in this, see the next section. The first step
in
fixing your battery is to open it up. Do this at an anti-static
workstation.
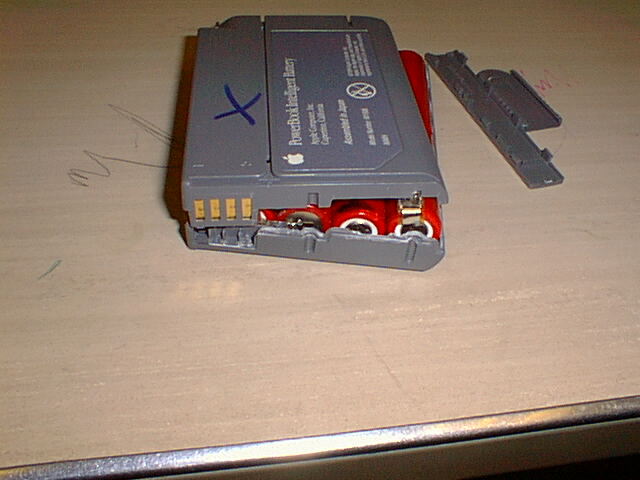
- Remove the darker gray end cover from the
battery pack. You can twist it off with your hand. It takes a little
force, but it comes off. Remove the slide on safety cover for the
battery connections from the other side.
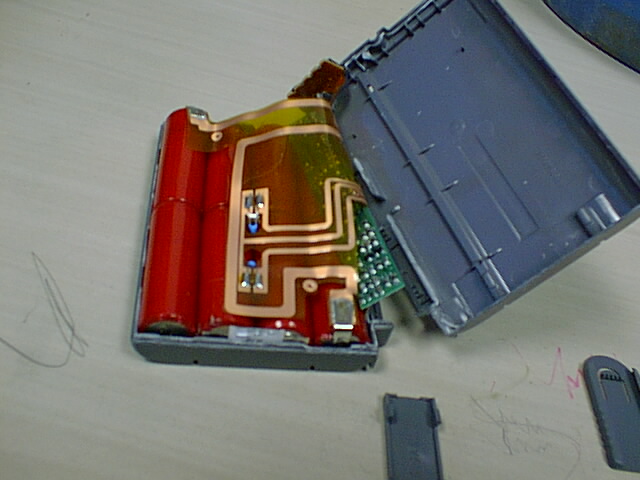
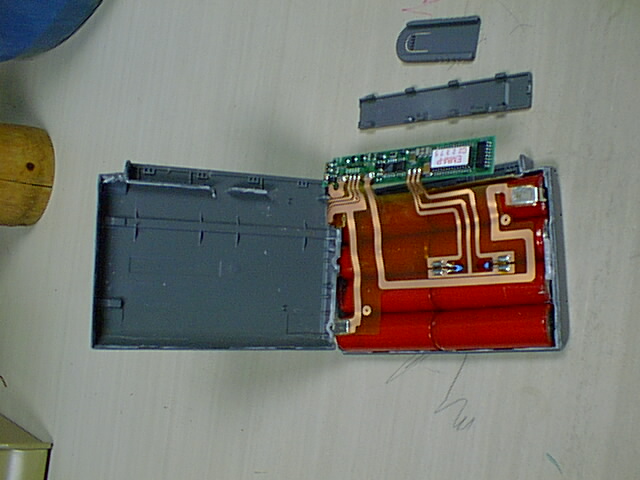
- Using a knife, cut the rectangular plastic
panel on the flat side of the battery (the side of the battery that
faces the back of the powerbook when installed in the powerbook). You
will now see the on board processor and battery charging circuitry on a
little circuit board that fits in this rectangular space. Note that you
can tell which side of the plastic cover overlaps the other now.
- Using the knife again on the side of the
battery that the end cap was on you can cut between the two plastic
halves of the case. You can do the same on the side of the battery that
is rounded and is closest to you when mounted in the powerbook. It is a
little scary, but
you can pry the two halves apart. I let it hinge on the part with the
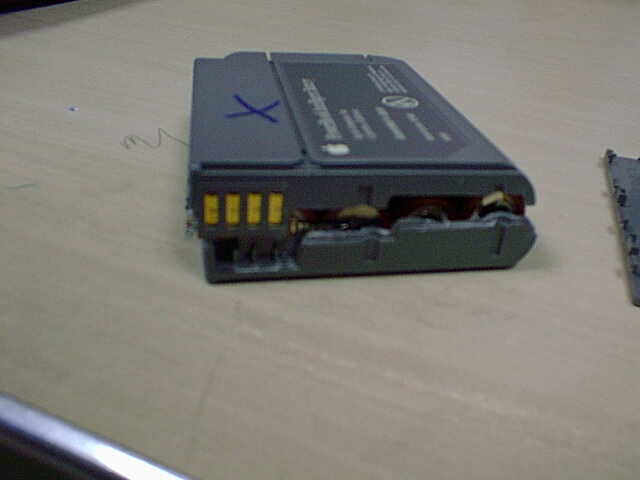
electrical connections. Here are some photos of the insides of
the battery
packs. First one.
Second
one. Third one.
Forth
one.
- Cut the electrical connections to the three
places on the cells in a way so that you can solder them back together
again later. Use a voltmeter to locate any shorted cells.
- Charge a large capacitor (I used 3500 uF at
75 volts). Discharge it through the shorted cell/cells you found, with
the positive end of the capacitor going to the positive side of the
battery. It will burn off any dendrites that have formed to short your
cell.
- Solder the cells back in and re-assemble the
battery pack.
- Re-insert the battery. Use the Intelligent
Battery Reconditioning software from Apple or from Lind Electronics to
reload the EEPROM on the battery board. Then let it charge. Don't be
discouraged if the software claims that something is wrong and you need
to send your battery back to Apple. Mine said that, but my battery
works just fine. Let it charge.
Replace the Cells in your Intelligent
Battery
This is a better procedure than fixing the
shorted cells in your powerbook, but costs about $50 for the cells,
assuming you buy
them from Digikey. Digikey
stocks
the Panasonic cells with tabs. The cells you will need are
Panasonic HHR-210A, or you can use Sanyo HR-A cells. Be sure and
get cells with solder tabs. (If you can't find ones with solder
tabs, I found a place in California that would weld them on for $0.50
each plus postage. The
company name is TNR, and their address is: 1779 Main, Suite A,
Irvine,
CA 92614. I believe their phone number is (800)490-8418.)
I've
had better luck with the Sanyo's, probably because the ones I got were
from
newer stock. The rough procedure is outlined below:
- Remove the darker gray end cover from the
battery pack. You can twist it off with your hand. It takes a little
force, but it comes off. Remove the slide on safety cover for the
battery connections from the other side.
- Do everything that follows in a static free
environment.
- Using a knife, cut the rectangular plastic
panel on the flat side of the battery (the side of the battery that
faces the back of the powerbook when installed in the powerbook). You
will now see the on board processor and battery charging circuitry on a
little circuit board that fits in this rectangular space. Note that you
can tell which side of the plastic cover overlaps the other now.
Using the knife again on the side of the battery that the end cap was
on you can cut between the two plastic halves of the case. You can do
the same on the side of the battery that is rounded and is closest to
you when mounted in the powerbook. It is a little scary, but you can
pry the two halves apart. I let it hinge on the part with the
electrical connections. Here are some photos of the insides of
the battery packs. First one.
Second
one. Third one.
Forth
one.
- Remove the old cells, being careful to note
the polarity, and connections Replace the old cells with new
ones. Be sure to replace the temperature sensors and thermal
fuse. (I think that is what they are, anyway.) Also, be
sure to make all solder connections
as small as possible, because it turns out to be a bit tricky to get
all
the cells to fit back inside the case. Be sure that there is no
possibility of shorting cells out. (Remove excess parts of the
tabs.)
- Re-assemble the battery pack. The end
caps hold everything together.
- Use the software available from Lind Electronics (BU500
Deluxe 2.01 available below) to set the battery to the original
settings. You can also pick whether to set them to Panasonic or
Sanyo settings. Don't be too alarmed if there are some errors
that can't be fixed. I've had this problem on three of three
batteries I've tried, but only one of them didn't work.
Lind Battery Utilities 500
For use with PowerBook 500 series that
have not been upgraded to Power PC.
Download it!
Installation Instructions
1. Insert the floppy disk into the PowerBook 500 series floppy
drive.
2. Drag the file named "BU 500 Deluxe" onto your hard drive.
3. Drag the file named "Battery Capacity CS" into the Control
Strip Modules folder located in your System Folder.
4. Restart your Macintosh.
Note: (The files found in the
"Assorted Control Strip Modules" folder are shareware programs and are
not a required part of the BU 500 program. They are installed by
being dragged into the Control Strip Modules folder located in your
System Folder.)
Starting the Software
1. Double click on the file named "BU 500 Deluxe".
2. Operating instructions are found by clicking on the desired
Topic in the left hand window.
3. The right hand Discussion Window then displays the desired
information.
- Charge the battery. Note how it charges
up. If it isn't taking a full charge, at first, don't be
discouraged. The data sheet for the NiMH cells says that
batteries that have been stored for a while won't charge fully for a
few cycles. The symptoms of this
problem is that the battery will charge at a normal rate for a while,
and then when it still is not fully charged (several segments aren't
darkened
on the indicator) it will all of a sudden claim to be fully
charged. On the discharge, the opposite happens. It looks
like you have plenty of time left, and then all of a sudden you are
empty! I had this problem
with the Panasonic cells I got. (I didn't get them from
Digikey.) In fact, with the Panasonic cells I tried, the original
capacity was only
about 20%. After about five cycles, the capacity is about 80%,
and
I expect it to continue to increase to 100%. Let me know how it
works
for you. I'm looking for more hints to put on this page,
especially
on this topic, because I think the batteries are the only big thing
keeping
me from using my trusty 520c for many years to come.
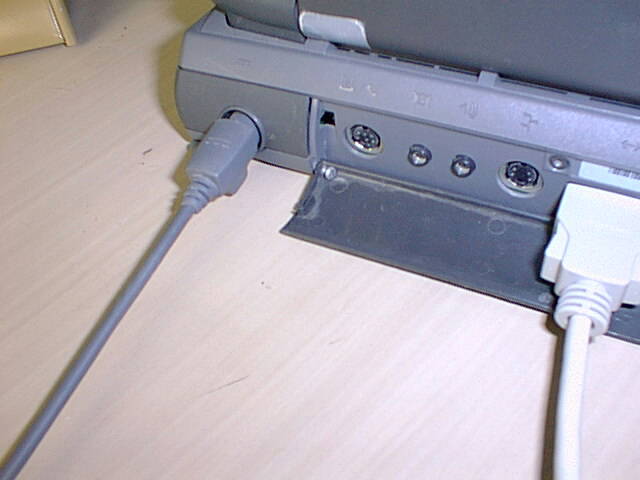
Did your Port Cover Come Off?
Well I've got two Powerbook 520 notebooks, and
both of mine came off. The one at home we leave connected to the
printer and the telephone all the time. My wife said she preferred
having it off because it
wasn't flopping in the way all the time. The one I carry around the
office I decided to fix though. Here is what I did.
- I found two small screws, a little smaller
than 1/16" in diameter and about 1/4" long.
- I drilled a hole in each of the corners of
the port cover so that when I screwed the screws in I had a replacement
for the plastic bump that held the cover in place originally.
- I could then put the cover on and screw the
screws in so it won't come off again (so easily anyway).
- Here is a photo.
My Powerbook Won't Turn On!
I had this happen when my powerbook was quite
new. I almost sent it back to Apple, but then I discovered if I left it
charging overnight, it would come on again. Try this trick before
panicking! I've also noticed that the power connectors on these
powerbooks can be rather flaky. I'd be sure that it is fully
plugged in as well.
Links to Other Powerbook 500 Series Pages
If you have specific questions about these fixes or modifications feel
free to send me an email. My address is my first name "dot" my
last name "at sign" wallawalla "dot" edu. I plan on
putting some photos that will make the descriptions more understandable
in
this document as soon as I get the digital camera I ordered.