Save My White board is an application for teachers and others who use a whiteboard and wish to save it. You need a camera; digital one is the handiest type, and this software.
This software is copyright Rob Frohne, 2001 and 2002.
The basic procedure is this. After a whiteboard has been filled up with notes take photos of the board. Then transfer them to the computer and use this software to select the parts of the whiteboard to save. The software takes the keystone effect away and the background color out of these pictures. The resulting pictures may be saved in quite a number of formats for distribution to those who need the information. It may also be printed without using a tremendous amount of ink, because the background has been removed.
The keystone effect is due to the law of perspective. It turns rectangular things like whiteboards into trapezoidal shapes on images like photos. It is often seen on the screen when showing slides. The bottom of the image appears smaller than the top because it is closer to the projector.
The keystone effect may be removed from your photos by selecting the four corners of the trapezoidal area on the image. See the example below. Then select Make Notes -> Keystone Only from the menu. The size of the resulting image is determined by the settings available for tweaking under Preferences.
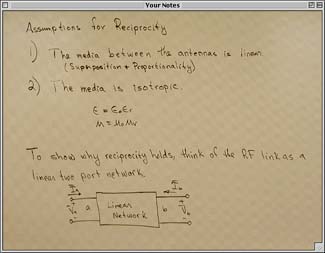
The output window looks like this in Classic Mac OS.
You may save your work by selecting the menu File - > Save.
You may remove the keystone and turn the background white by selecting Make Notes -> Background & Keystone .
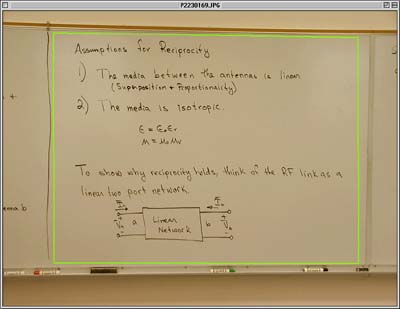
The background can be removed to make a less distracting set of notes that will not take as much ink to print if that is desired. To accomplish this select the trapezoidal area you wish to transform in the photo as seen above. The green lines show you what you have selected. The four corners that you select should be in the white area of the whiteboard, because these points are used to sample the background color of the whiteboard. Then from the menu select Make Notes -> Background & Keystone. You should see a watch cursor and eventually a progress bar telling you how much has been accomplished. It takes about ten seconds on my 250 MHz G3 powerbook for ordinary 640 x 480 output.
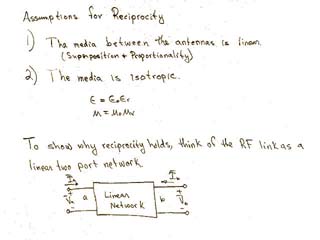
A typical output looks like this.
Removing the background is actually
a fairly difficult image processing problem to solve, and so it doesn't always
turn out perfect. You may want to see the sections
"Tips for taking the photos"
and
"How do I understand the background adjustments in the Preferences?
To minimize the time you spend tweaking with the settings in the Background Removal Preferences, you can follow some simple guidelines when taking the photos.
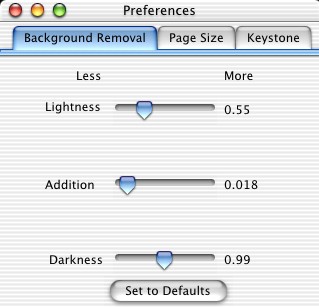
Select the menu, Edit -> Preferences. A preferences window, shown below in Mac OS X, will open that contains two tab selections.
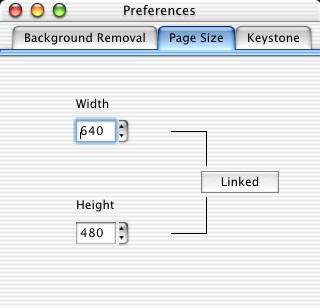
Select Page Size. You may now use the arrows to adjust the window size. If the button reads Linked , the height and width change proportionally. If Not Linked is printed on the button, then they are independent. Selecting the button toggles the two choices.
The background is removed by assuming that the four corners of the selected area of the whiteboard are the background color to be removed.
To understand the settings you must first understand how the CMY color scheme works. Each pixel has a value for cyan (C), magenta (M), and yellow (Y). These values range from 0.0 to 1.0. The color may then be thought of a a point inside the unit cube in three space.
The colors that are assumed to be the background are inside an ellipsoid of revolution whose foci are determined by the parameters in the Background Removal Preferences. Before we elaborate on that you need to understand how an ellipsoid of revolution is formed.
An ellipsoid of revolution is a three dimensional surface described by two points and one distance. The two points are called the foci. The sum of the distance from any point on the ellipsoidal surface to each focus is a constant (greater than the distance between the foci). The larger the constant, the fatter the ellipsoid. As the constant approaches its minimum value, the ellipsoid encompasses the points on a line between the foci. As the foci come closer together, the ellipsoid becomes a sphere.
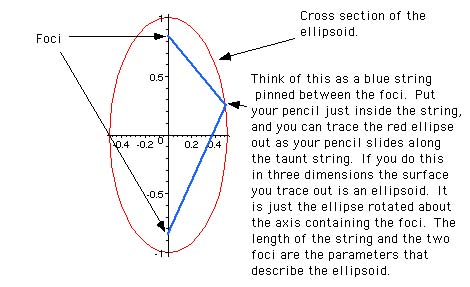
The foci of the ellipsoid are taken from the color point of the corner with the largest length. One foci is that point scaled (multiplied) by Darkness number. The other foci is that point scaled by minus the Lightness number.
The distance length of the "blue string" is the distance between the foci of the ellipsoid plus the Addition number.
These adjustments are available under Edit -> Preferences in the Background Removal tab panel.
You can select a bunch of photos in the finder and drop them on the Save My White board application. If you do too many and you are using Mac OS (not OS X), you will be very likely to run out of memory. You can add more memory to the application by selecting it in the finder and using the menu File - > Get Info to change the memory allocation. Save My White board is now multi-threaded, so you can simultaneously transform many images at once.