Bootloader Programming: Difference between revisions
| Line 4: | Line 4: | ||
We really should have provided a programming header for that as well as the one for the USB/serial programmer, but since we didn't, the professor will program your ATMEGA328P units using the information on [http://angryelectron.com/how-to-update-the-bootloader-on-arduino-pro-mini-328/ this web page]. | We really should have provided a programming header for that as well as the one for the USB/serial programmer, but since we didn't, the professor will program your ATMEGA328P units using the information on [http://angryelectron.com/how-to-update-the-bootloader-on-arduino-pro-mini-328/ this web page]. | ||
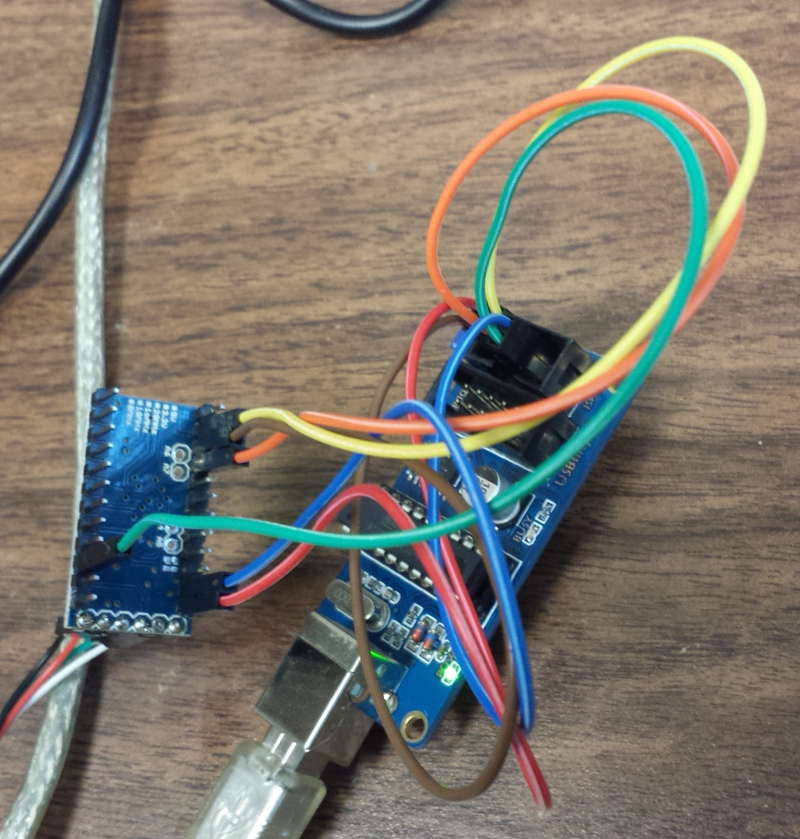
On the USBtinyISP six pin header, the connections I made are: | |||
Pin 1 in brown. | Pin 1 in brown. | ||
Pin 2 in red. | Pin 2 in red. | ||
| Line 10: | Line 10: | ||
Pin 4 is yellow. | Pin 4 is yellow. | ||
Pin 5 is green. | Pin 5 is green. | ||
Pin 5 is blue. | Pin 5 is blue. | ||
The connections on the Pro Mini are from [http://angryelectron.com/how-to-update-the-bootloader-on-arduino-pro-mini-328/ here].[[File:Programmer connections.jpg]] | |||
First I need to check to see that the fuses are okay, and that the USBtinyISP will work. | First I need to check to see that the fuses are okay, and that the USBtinyISP will work. | ||
Revision as of 15:46, 4 March 2014
Bootloader Programming
The bootloader is a program that needs to be loaded into the ATMEGA328P before you can program your Arduino with the USB/serial programmer.
We really should have provided a programming header for that as well as the one for the USB/serial programmer, but since we didn't, the professor will program your ATMEGA328P units using the information on this web page.
On the USBtinyISP six pin header, the connections I made are:
Pin 1 in brown.
Pin 2 in red.
Pin 3 is orange.
Pin 4 is yellow.
Pin 5 is green.
Pin 5 is blue.
The connections on the Pro Mini are from here.
First I need to check to see that the fuses are okay, and that the USBtinyISP will work.
$ avrdude -c usbtiny -p m328p

avrdude: AVR device initialized and ready to accept instructions

Reading | ################################################## | 100% 0.01s

avrdude: Device signature = 0x1e950f

avrdude: safemode: Fuses OK

avrdude done.  Thank you.
I read the original firmware into an Intel hex file using this command below just in case the ATmegaBOOT_168_atmega328_pro_8MHz.hex file doesn't work.
$ avrdude -c usbtiny -p m328p -U flash:r:original.hex:i

avrdude: AVR device initialized and ready to accept instructions

Reading | ################################################## | 100% 0.01s

avrdude: Device signature = 0x1e950f
avrdude: reading flash memory:

Reading | ################################################## | 100% 50.06s


avrdude: writing output file "original.hex"

avrdude: safemode: Fuses OK

avrdude done.  Thank you.
Now I programmed the ATMEGA328 using the following command: Don't do this! It turned out to be a good thing I backed up the original firmware, because though the following programmed okay, I couldn't use the serial programmer to load sketches from the Arduino IDE.
$ avrdude -c usbtiny -p m328p -U flash:w:ATmegaBOOT_168_atmega328_pro_8MHz.hex

avrdude: AVR device initialized and ready to accept instructions

Reading | ################################################## | 100% 0.01s

avrdude: Device signature = 0x1e950f
avrdude: NOTE: FLASH memory has been specified, an erase cycle will be performed
         To disable this feature, specify the -D option.
avrdude: erasing chip
avrdude: reading input file "ATmegaBOOT_168_atmega328_pro_8MHz.hex"
avrdude: input file ATmegaBOOT_168_atmega328_pro_8MHz.hex auto detected as Intel Hex
avrdude: writing flash (32652 bytes):

Writing | ################################################## | 100% 68.70s


avrdude: 32652 bytes of flash written
avrdude: verifying flash memory against ATmegaBOOT_168_atmega328_pro_8MHz.hex:
avrdude: load data flash data from input file ATmegaBOOT_168_atmega328_pro_8MHz.hex:
avrdude: input file ATmegaBOOT_168_atmega328_pro_8MHz.hex auto detected as Intel Hex
avrdude: input file ATmegaBOOT_168_atmega328_pro_8MHz.hex contains 32652 bytes
avrdude: reading on-chip flash data:

Reading | ################################################## | 100% 48.37s


avrdude: verifying ...
avrdude: 32652 bytes of flash verified

avrdude: safemode: Fuses OK

avrdude done.  Thank you.
So after testing and finding this bootloader wouldn't allow programming sketches from the Arduino IDE, I flashed back the original firmware, and it worked.
$ avrdude -c usbtiny -p m328p -U flash:w:original.hex:i

avrdude: AVR device initialized and ready to accept instructions

Reading | ################################################## | 100% 0.01s

avrdude: Device signature = 0x1e950f
avrdude: NOTE: FLASH memory has been specified, an erase cycle will be performed
         To disable this feature, specify the -D option.
avrdude: erasing chip
avrdude: reading input file "original.hex"
avrdude: writing flash (32670 bytes):

Writing | ################################################## | 100% 67.85s


avrdude: 32670 bytes of flash written
avrdude: verifying flash memory against original.hex:
avrdude: load data flash data from input file original.hex:
avrdude: input file original.hex contains 32670 bytes
avrdude: reading on-chip flash data:

Reading | ################################################## | 100% 49.58s


avrdude: verifying ...
avrdude: 32670 bytes of flash verified

avrdude: safemode: Fuses OK

avrdude done.  Thank you.